Octopus Deploy is a sophisticated, best-of-breed continuous delivery (CD) platform for modern software teams. Octopus offers powerful release orchestration, deployment automation, and runbook automation, while handling the scale, complexity and governance expectations of even the largest organizations with the most complex deployment challenges.
Octopus has a modern, friendly user experience that makes it easy for your teams to self-service application releases, and democratizes how you deliver software. Octopus also has a comprehensive API - anything the UI can do, the API can do too.
Octopus takes over where your CI server ends, modelling the entire release orchestration process of software. This includes:
- Release versioning
- Environment promotion (beyond simple dev/test/prod workflows)
- Deployment automation
- Progressive software delivery (rolling deployments, blue/green, canary)
- Configuration management
- Approvals & ITSM integration
- Deployment freezes
- Coordinating deployments across projects and their dependencies
You can use Octopus to deploy anything, anywhere. Whether it’s Kubernetes, Linux or Windows virtual machines, Amazon Web Services, Azure, or Google Cloud, so long as Octopus can speak to it via our Tentacle agent, SSH, command line, or a web service, Octopus can deploy to it.
Advanced role-based access control ensures only the right people can deploy to production, all changes are audited, and teams can get their work done without proliferation of admin access to cloud accounts or privileged systems.
Octopus can be self-managed and hosted in your own infrastructure or private cloud, or we can host it for you in Octopus Cloud.
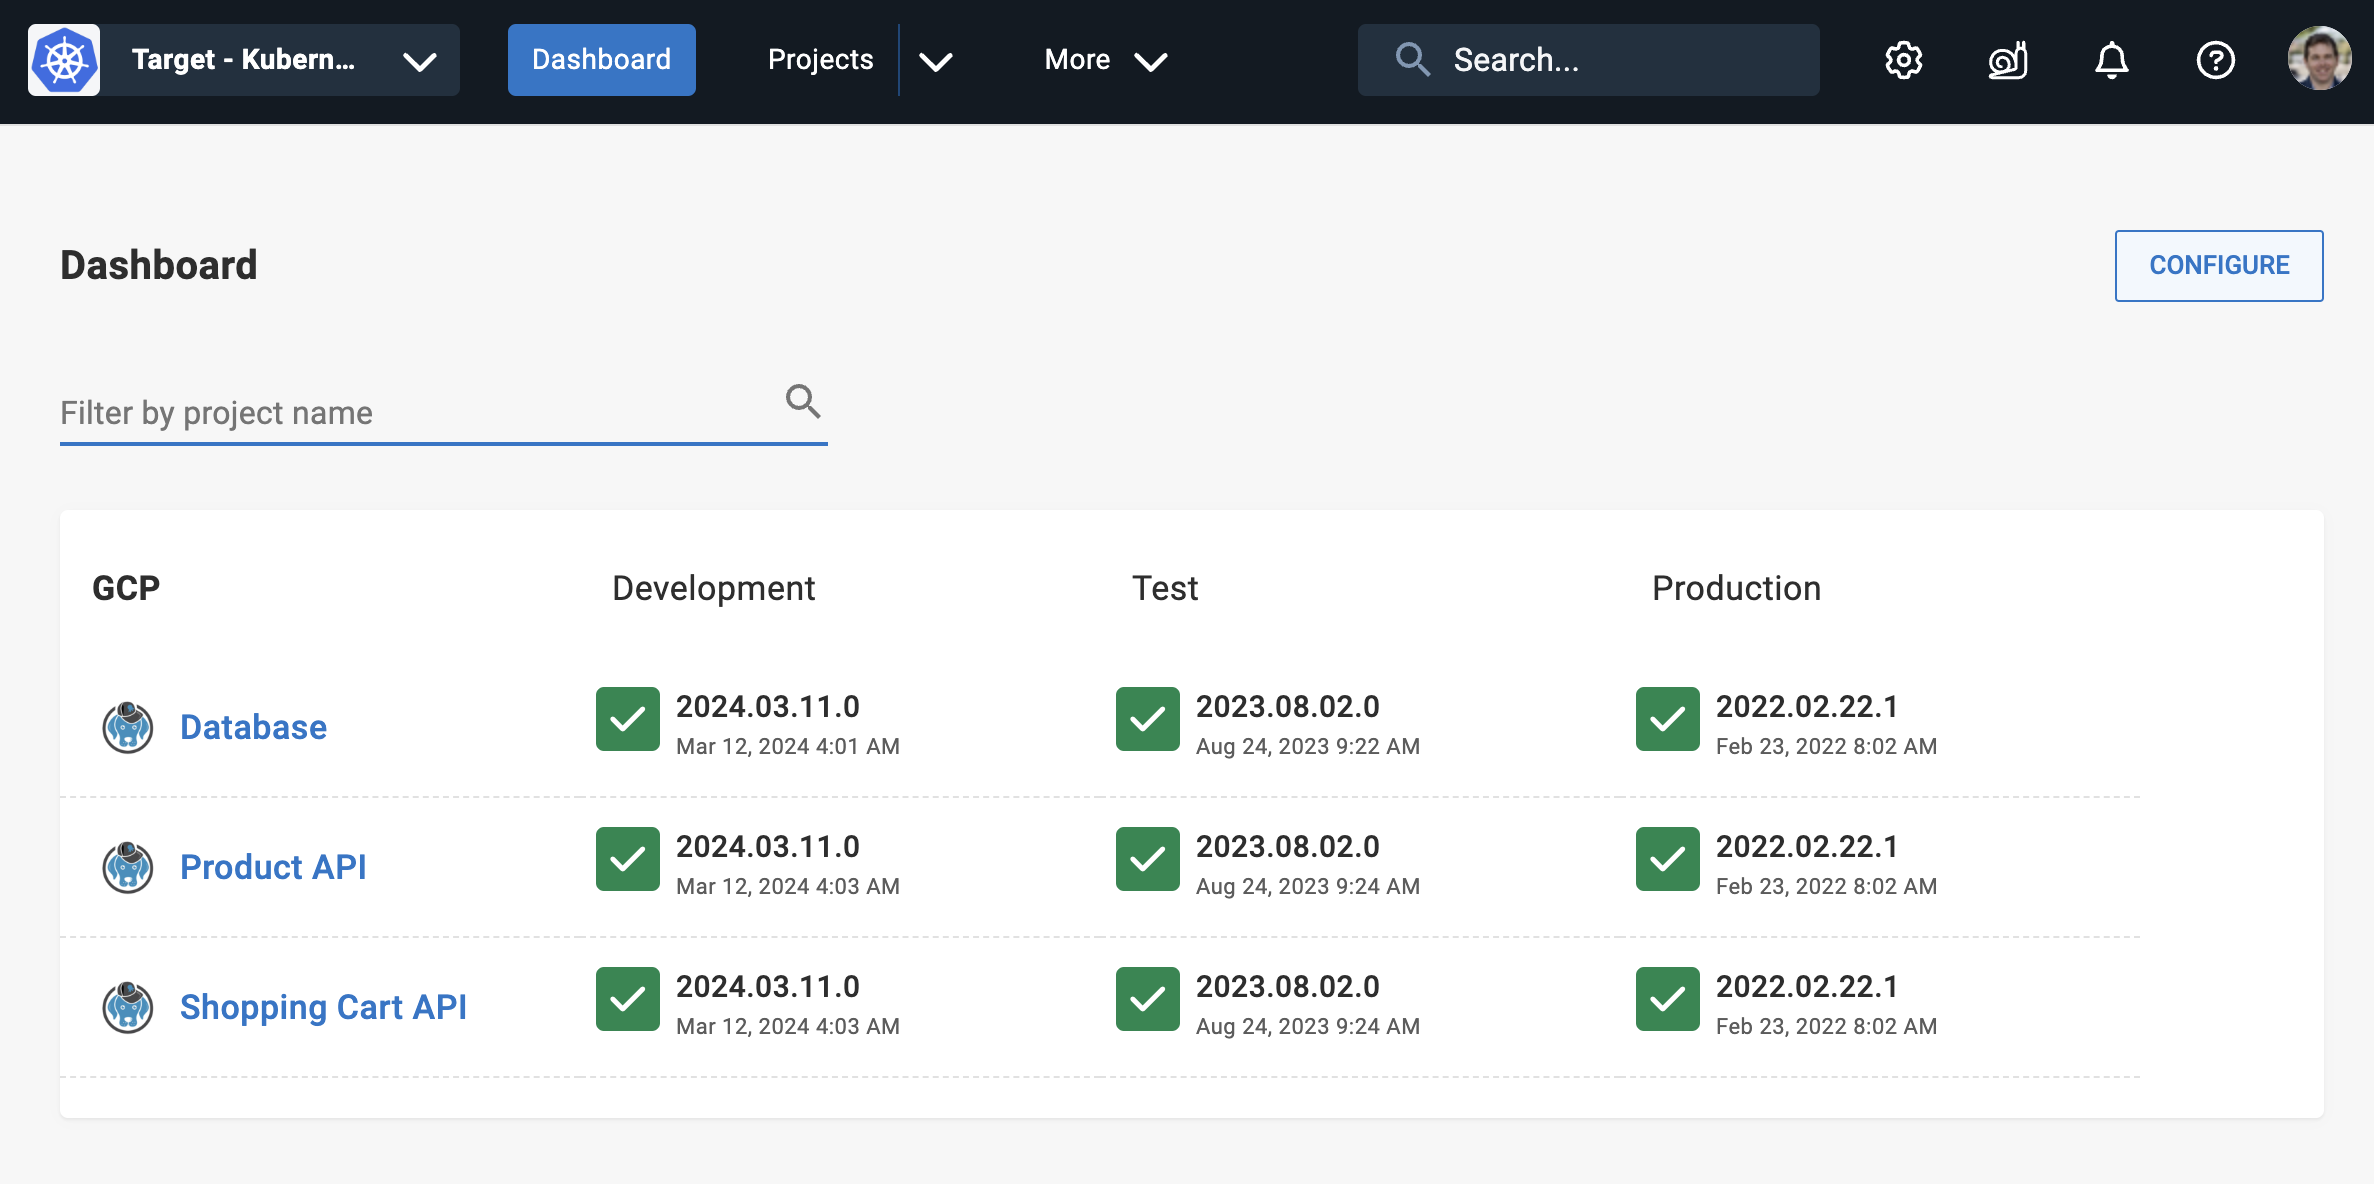
Octopus models deployments in advanced ways that allows you to tame complexity at scale. For example, if “deploying to production” means a coordinated rollout of applications and dependencies across geographically distributed clusters in the cloud on behalf of thousands of end-customers, each with their own instances of your application, or pushing releases out to edge networks or servers running in physical retail stores, hospitals or hotels, Octopus enables you to model this in ways no other CD tool can using tenanted deployments.
Built by experienced DevOps practitioners over a decade, and battle tested by thousands of organizations ranging from small teams to large Fortune 100 organizations with tens of thousands of engineers, projects and deployment targets, Octopus embodies a set of principles about what we’ve learned in doing CD well:
- CI is not CD
- Build your binaries/containers once
- Consistency across processes, teams and environments
- Pragmatic use of version control and GitOps
Why do I need Octopus, I have a CI/CD tool
On most teams, continuous integration (CI) or build automation is a solved problem. Great options like GitHub Actions, GitLab CI, Jenkins, TeamCity, BuildKite, and Azure DevOps exist and are widely used by teams today.
These systems are all designed in a similar way - they monitor source code repositories for changes, compile code, run unit tests, and give software developers fast feedback on their code changes.
For most of these systems, the CD functionality often just means they provide some ability to call a deployment script that you provide - the deployment script is up to you. They might also provide some way to model simple dev/test/production promotion workflows by calling a different deployment script for each environment.
When a software team is starting out, this “put your deployment script here” approach to CD can work - the deployment script starts simple. Over time as applications evolve, complexity grows. That “deployment script” becomes hundreds and thousands of lines of specialized scripts and YAML that at best only a couple of people on the team understand or are comfortable changing. Multiply that over many teams and applications at the company and “DIY shadow CD” is born. Teams of engineers become dedicated to building custom CD glue to bridge the gap between “put your deployment script here” and the realities of the complexity of delivering software at scale.
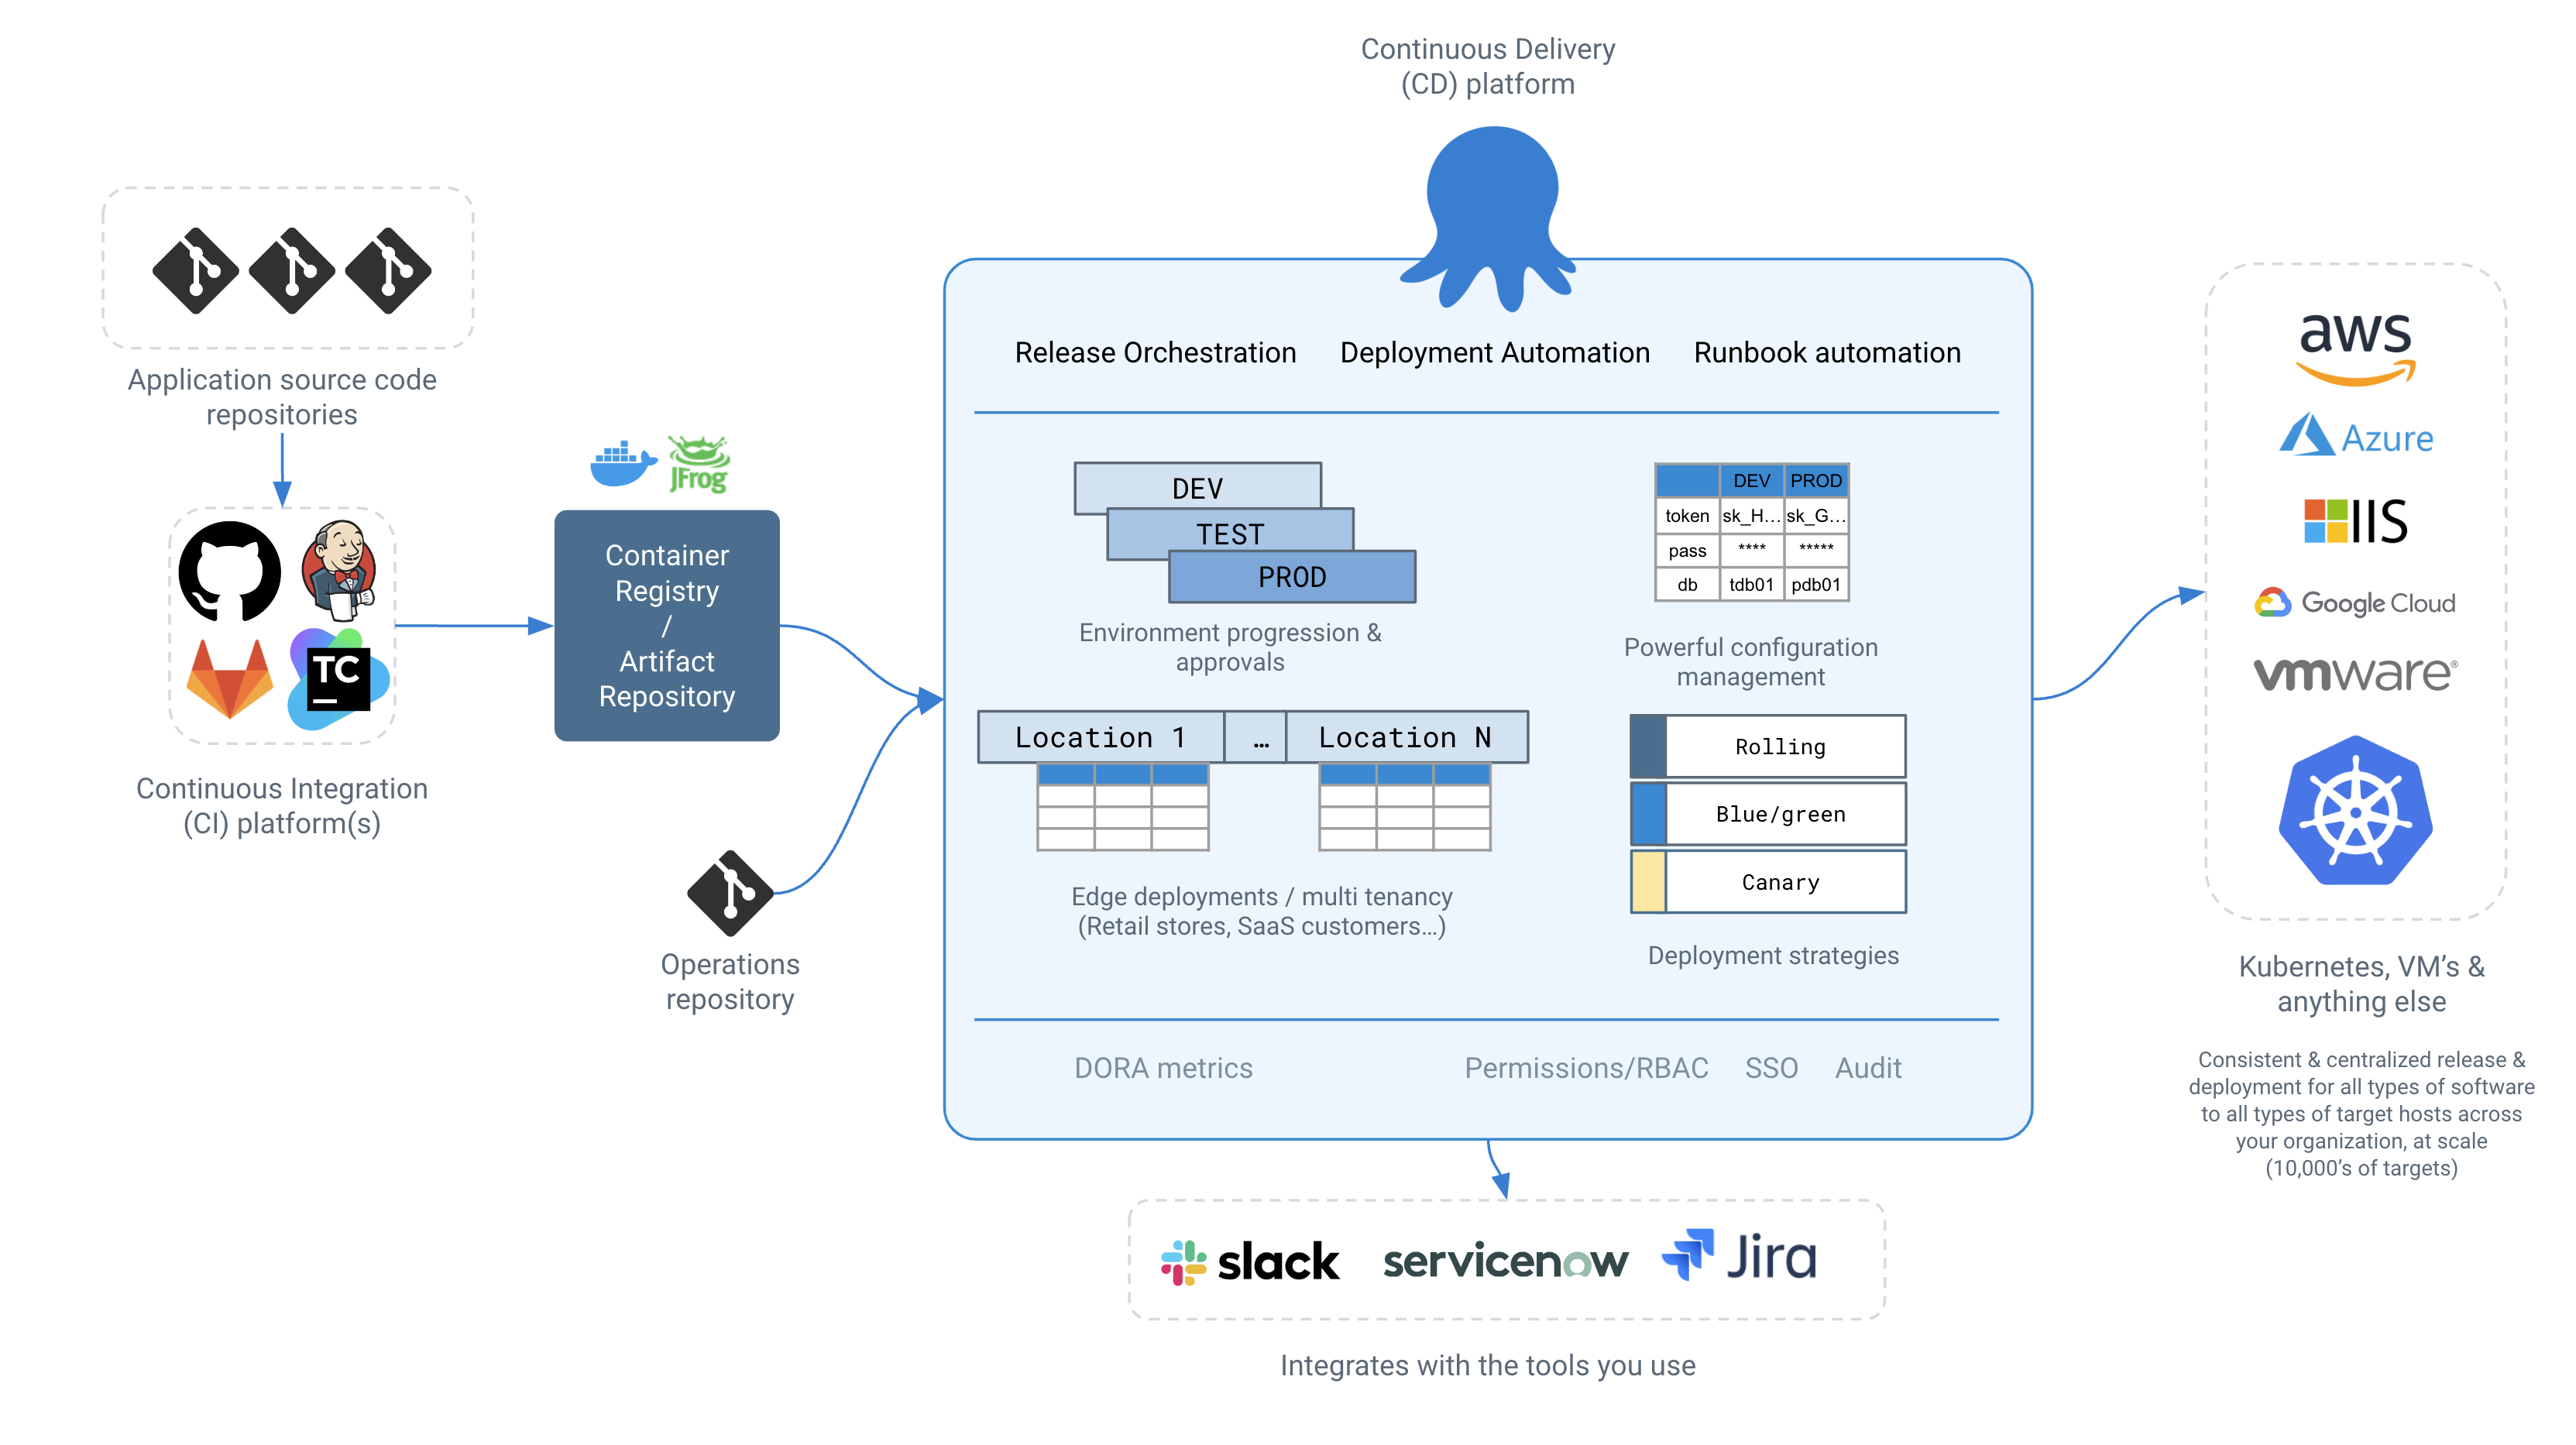
Decoupling the CI platform from the CD platform allows teams to bring their favorite CI tool - and most organizations have more than one - while we focus on giving you the most powerful best-of-breed CD capabilities. Octopus integrates with popular CI tools like GitHub Actions, Jenkins or TeamCity, letting them do what they do best - the CI part of the feedback loop. Octopus then takes over “artifact-forward”, and handles the release and deployment aspects of CD in advanced ways that no CI/CD tool can.
We promise that when using Octopus, compared to a generic CI/CD tool, you’ll spend 1/10th the amount of time building DIY shadow CD glue, and more time shipping new features and delivering valuable software to production.
Getting Started
Octopus is easy to get started with - you can go from zero to fully automating your deployments in minutes.
For a tour of the key Octopus concepts, begin with our Getting Started guide.
If you deliver software to Kubernetes, our Kubernetes overview is a good starting point.
If you enjoy learning via video, the Octopus 101 recording below also serves as a great introduction to the key Octopus concepts in the context of modern deployments.
We’re here to help
We designed Octopus to be easy to learn, but CD is an inherently complex problem domain.
Our 270+ people all over the globe have deep experience in all things CD, and we’re happy to help even when the problem is outside of Octopus.
If you get stuck or just need advice, we’re here to help.
- Email our support (we typically respond in under 1 hour)
- Join our community Slack
Happy deployments!
Recent changes
- Server-Side Apply
- Import certificates into WildFly and JBoss EAP
- Deployment freezes
- Getting started with the Octopus REST API
- Octopus REST API
Help us continuously improve
Please let us know if you have any feedback about this page.
Page updated on Monday, March 18, 2024